About

Edit photo

Showing posts with label Tricks & Tips. Show all posts

Monday, November 28, 2016

Aggregation functions in PIG


Example1:
year price
2015 60
2014 45
2016 34
2014 75
2015 45
2014 41
I would like to get the result as, total price of the item by year.

grunt> file = load '/tmp/yearprice.txt' using PigStorage(',') as (year:int,price:float);

grunt> data = foreach file generate year, price by $0 > 1;

grunt> group = group data by year;

grunt> sum = foreach group generate group as year, SUM(data.price);

grunt> dump sum;

2014 161
2015 105
2016 34


Example 2:

id1, 1,on,400 

id1, 2,off,100

id2, 3,on,200
i would like to get the result as "sum of $3 if $2 is 0, by ID $0"

grunt> file = load '/tmp/file' using PigStorage(',');

grunt> refineData = foreach file generate $0, $1, (($2 == 'on') ? $3 : 0);

grunt> grp = group refineData by $0;

grunt> sum = foreach grp generate group as id, SUM(refineData.$2);

grunt> dump sum;

id1, 500
id2, 200

Wednesday, November 16, 2016

PIG left, right outer joins error


We know that, we can perform JOIN operation using pig, as well as left outer join, right outer join. sometimes you'll face error when working of left and right outer joins, but not to inner joins. that is because of schema.

Even if there is no schema can perform inner join, but not for left and right outer joins.

Left, right, outer joins will not be executed without well-defined bag schema. 

Left Join: Example, the below left join will not work, but


The following left join will work, because it has schema.

grunt> emp = load 'emp.txt' using PigStorage('|') as  (eid:int,name:chararray,sal:bytearray);
grunt> dept = load 'dept.txt' using PigStorage('|') as (did:int,eid:int,name:chararray);
grunt> ljoin = join emp by eid left,dept by eid;
grunt> dump ljoin;


Right Join:
grunt> rjoin = join emp by eid right,dept by eid;
grunt> dump rjoin;


Monday, June 20, 2016

What is HTTP Tunneling - Connections Through Restrictions


It is used to bypass firewalls and other network restrictions and an HTTP tunnel is used to create a direct network link between two locations.


But before proceeding further, let us look into the meaning of some of the terms we will use in this context.

Commonly Used Terms

HTTP

HTTP or Hyper Text Transfer Protocol is the network protocol or language used by web browsers to communicate with web servers. HTTP defines how messages should be formatted and transmitted, what actions web servers and browsers should take in response to various commands. For example, when you enter a URL as the web address, an HTTP command is sent to the web server directing it to fetch and transmit the requested web page. HTTP is called a stateless protocol because each command is executed independently, without any knowledge of the preceding commands.

Tunneling

Tunneling, also known as “port forwarding,” is the method of transmitting private network data and protocol information through public network by encapsulating the data.   Tunneling is when instead of sending a packet directly through the network, the data is sent inside another encrypted connection. Tunneling can be achieved by nearly all protocols. A tunnel is used to ship a foreign protocol across a network that normally wouldn’t support it. You can take protocol A and wrap it or put it in a tunnel with protocol B. If you want to refresh your knowledge on TCP/IP models, Network Protocols, Network security, VPNs then CompTIA Network+ N10-005 is an excellent course to browse through.
Tunneling provides the basic underlying structure for setting up a VPN or Virtual Private Network. VPN is a network that is constructed by using public connections, usually the internet to connect to a private network, such as a company’s internal network. The process involves use of encryption and transmission protocols to create secure virtual tunnels for data transmission. This ensures that only authorized users can access the network and that the data cannot be intercepted. Data is transmitted in the form of packets over the Internet. The information contained in a data packet is called the payload and contains the routing information required to transmit the packet to a remote destination.
In VPN connection, a tunnel provides a secure medium for data exchanged between the corporate intranet, remote users, and networks of branch offices, suppliers, and business partners. The creation of a tunnel requires the following:
  • Carrier protocol: This is the network transport protocol to be used as the carrier protocol, for example PPP.
  • Encapsulation protocol: This protocol will encapsulate the payload of a data packet.
  • Passenger protocol: Refers to the protocol used by the by the data packets that are being transmitted through the tunnel. NetBEUI is an example of passenger protocol.

What is HTTP Tunneling?

HTTP tunneling is the process in which communications are encapsulated by using HTTP protocol. An HTTP tunnel is often used for network locations which have restricted connectivity or are behind firewalls or proxy servers. A firewall is typically a computer and software that sits between a group of client users and the wider outside Internet or intranet. The firewall is used to protect the internal client network from unauthorized access from outside the firewall.
Certain networks may have restricted connectivity in the form of blocked TCP/IP ports. Traffic is restricted from outside the network to secure it from internal and external threats and most network protocols are restricted except a few which are used for secured communication.  If a user, for example, in a corporate environment has no permission to open TCP connections the user cannot use certain services or connect to the internet. In such a case, HTTP tunneling is a possible solution, when the protocol is encapsulated inside HTTP requests that can pass through the firewall or HTTP proxy. In HTTP tunneling, HTTP protocol acts as a wrapper for a channel that the network protocol being tunneled uses to communicate. HTTP tunnel software is used for this purpose which consists of client-server HTTP tunneling applications that integrate with existing application software, and allow them to communicate in restricted network connectivity. The application plays the role of a tunneling client. HTTP tunnel clients are used to access applications from behind restrictive firewalls or proxy servers, to access blocked sites, or to share confidential resource over HTTP securely.

How to Implement HTTP Tunneling?

When a HTTP connection is made through a proxy server, the client, which is usually the browser, sends the request to the proxy. The proxy opens the connection to the destination, sends the request, receives the response and sends it back to the client. The HTTP protocol specifies a request method called CONNECT. The CONNECT method can be used by the client to inform the proxy server that a connection to some host on some port is required. The proxy server tries to connect to the destination address specified in the requested header. If the operation fails, it sends a negative HTTP response back to the client and closes the connection. If the operation succeeds, it sends back an HTTP positive response and the connection is established. After that, the proxy server transmits and forwards all data in both directions between the client requesting the connection and the destination. It acts as the tunnel for this communication.
In some networks, the use of CONNECT method is restricted to some trusted sites. In such cases, an HTTP tunnel can still be implemented using only the usual HTTP methods as POST, GET, PUT and DELETE. In this case, the server runs outside the protected network and acts as a special HTTP server. The client program is run on a computer inside the protected network. Whenever any network traffic is passed to the client, it repackages it as an HTTP request and relays it to the outside server, which extracts and executes the original network request for the client. The response to the request, which was sent to the server is repackaged as an HTTP response and relayed back to the client. Since all traffic is encapsulated inside normal GET and POST requests and responses, this approach works through most proxies and firewalls.

Conclusion

Next time if you want to use your Internet applications safely despite restrictive firewalls and want an extra layer of protection against hackers, spyware, ID theft, then using HTTP tunnel may be the right option for you. IT Security Beginner: Certified Hacking Training course unfolds exciting facts on cyber threats and security.
Source: Udemy Blog

Tuesday, May 31, 2016

Tuesday, March 1, 2016

What is combiner in hadoop?


What is combiner?
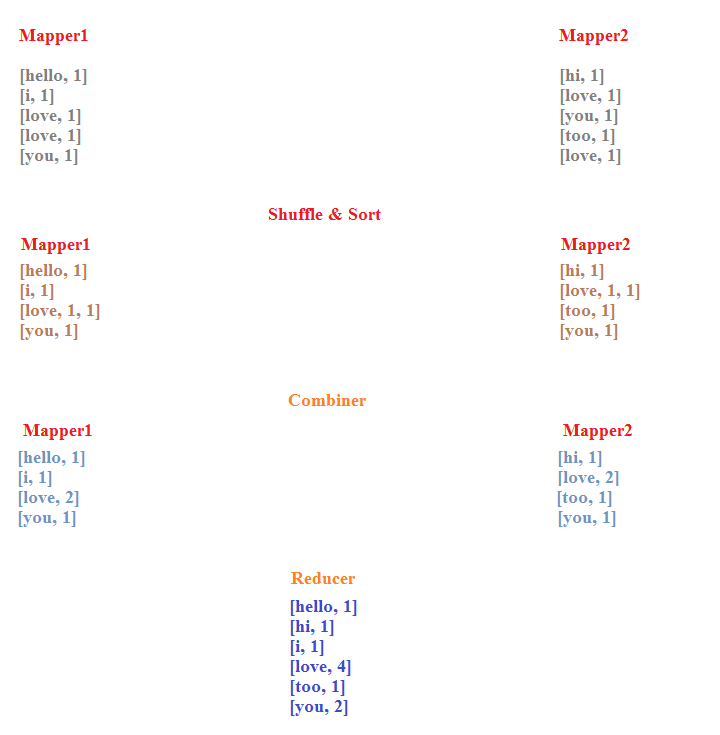
Combiner is a Mini Reducer that performs the local reduce task, because Combiner does the same work of Reducer and uses the same program of Reducer or can use custom code too. It receives the input from the mapper on a particular node and sends the output to the reducer. 

Use of combiner?
If combiner is doing the same work of reducer, then do we need combiner? yes, Combiners help in enhancing the efficiency of MapReduce by reducing the quantum of data that is required to be sent to the reducers.

How data is efficient?
Combiner does the work of reducer in the mapper it self and send the data to the reducer, and reducer combines all the data from all the mappers and produce final result in the form of <key, value>
for example, take the below example, Mapper produces output in <key, value>. the following data should be sent to the reducer via network. 

before reducer there is another phase, called shuffle & sort. used to shuffle the data and sort it in ascending order. Lets take the below picture, after shuffle and sort, assume the output is 100mb, takes 60sec to reach the reducer over network.


but if combiner comes in the picture, the data may be decreased depends on the number of repeated keys. if there are any repeated keys, the data is decreased, assume there are repeated keys, so the combiner runs reducer program in each mapper, so the size of the mapper output is decreased somewhat, guess 80mb, so it takes 40sec to reach reducer over network. So performance is increased by minimizing the data size.
example:


Reducer combines the repeated data and gives output as in the name of "part-r-00000".

How to use combiner in program?
It's very simple, just Add setCombinerClass(<reducercode>.class); in Driver Code, here can use reducer code or any custom code of your choice.

job.setJarByClass(lengthofword.class);
job.setMapperClass(mapperProg.class);
job.setCombinerClass(reducerProg.class);
job.setReducerClass(reducerProg.class);
job.setOutputKeyClass(Text.class);

NOTE:
combiner may not work if there is no free mapper available in the cluster.

If you like share my post and give boost. Post by @SsaiK

Tuesday, February 23, 2016

What is String Tokenizer in Java?


The string tokenizer class allows an application to break a string into tokens. It is very easy to use.


old way:
String[] result = "this is a test".split("\\s");
     for (int x=0; x<result.length; x++)
         System.out.println(result[x]);

New way:
StringTokenizer st = new StringTokenizer("this is a test");
     while (st.hasMoreTokens()) {
         System.out.println(st.nextToken());
     }

It checks, if there are any more tokens available or not, if TRUE, prints the token, FALSE, terminates the loop.


System.out.println("---- Split by space ------");
  while (st.hasMoreElements()) {
   System.out.println(st.nextElement());
   
System.out.println("---- Split by comma ',' ------");
  StringTokenizer st2 = new StringTokenizer(str, ",");

  while (st2.hasMoreElements()) {
   System.out.println(st2.nextElement());


For example, if your file (test.txt) contain the content like
1| 3.29| mkyong
2| 4.345| eclipse


String line;
br = new BufferedReader(new FileReader("c:/test.txt"));
while ((line = br.readLine()) != null) 
{
 System.out.println(line);
 StringTokenizer stringTokenizer = new StringTokenizer(line, "|");
 while (stringTokenizer.hasMoreElements()) 
 {
  Integer id = Integer.parseInt(stringTokenizer.nextElement().toString());
     Double price = Double.parseDouble(stringTokenizer.nextElement().toString());
     String username = stringTokenizer.nextElement().toString();
     
  StringBuilder sb = new StringBuilder();
  sb.append("\nId : " + id);
  sb.append("\nPrice : " + price);
  sb.append("\nUsername : " + username);
  sb.append("\n*******************\n");

  System.out.println(sb.toString());
   }
}

Output:
1| 3.29| mkyong

Id : 1
Price : 3.29
Username :  mkyong
*******************

2| 4.345| eclipse

Id : 2
Price : 4.345
Username :  eclipse
*******************

Thursday, February 4, 2016

how to delete windows.old in windows 10


One month after you upgrade to Windows 10, your previous version of Windows will be automatically deleted from your PC. However, if you need to free up disk space, and you’re confident that your files and settings are where you want them to be in Windows 10, you can safely delete it yourself. Keep in mind that you'll be deleting your Windows.old folder, which contains files that give you the option to go back to your previous version of Windows. Deleting your previous version of Windows can’t be undone.
  1. In the search box on the taskbar, type Settings, then select it from the list of results.

  1. Select System > Storage  > This PC and then scroll down the list and select Temporary files.


  1. Under Previous version of Windows, select Delete previous versions and then select Delete.

Source: Microsoft

Saturday, January 30, 2016

How to reset your password in Ubuntu


Its very simple to reset the password and create new one in just 5seconds...
First, you have to reboot into recovery mode.
If you have a single-boot (Ubuntu is the only operating system on your computer), to get the boot menu to show, you have to hold down the Shift key during bootup.

From the boot menu, select recovery mode, which is usually the second boot option.

After you select recovery mode and wait for all the boot-up processes to finish, you'll be presented with a few options. In this case, you want the Drop to root shell prompt option so press the Down arrow to get to that option, and then press Enter to select it.
The root account is the ultimate administrator and can do anything to the Ubuntu installation (including erase it), so please be careful with what commands you enter in the root terminal.
In recent versions of Ubuntu, the filesystem is mounted as read-only, so you need to enter the follow command to get it to remount as read-write, which will allow you to make changes:
mount -o rw,remount /

If you have forgotten your username as well, type
ls /home
That's a lowercase L, by the way, not a capital i, in ls. You should then see a list of the users on your Ubuntu installation. In this case, I'm going to reset Susan Brownmiller's password.
To reset the password, type
passwd username
where username is the username you want to reset. In this case, I want to reset Susan's password, so I type
passwd susan
You'll then be prompted for a new password. When you type the password you will get no visual response acknowledging your typing. Your password is still being accepted. Just type the password and hit Enter when you're done. You'll be prompted to retype the password. Do so and hit Enter again.
Now the password should be reset. Type
exit
to return to the recovery menu.


After you get back to the recovery menu, select resume normal boot, and use Ubuntu as you normally would—only this time, you actually know the password!