About

Edit photo

Tuesday, February 23, 2016

What is String Tokenizer in Java?


The string tokenizer class allows an application to break a string into tokens. It is very easy to use.


old way:
String[] result = "this is a test".split("\\s");
     for (int x=0; x<result.length; x++)
         System.out.println(result[x]);

New way:
StringTokenizer st = new StringTokenizer("this is a test");
     while (st.hasMoreTokens()) {
         System.out.println(st.nextToken());
     }

It checks, if there are any more tokens available or not, if TRUE, prints the token, FALSE, terminates the loop.


System.out.println("---- Split by space ------");
  while (st.hasMoreElements()) {
   System.out.println(st.nextElement());
   
System.out.println("---- Split by comma ',' ------");
  StringTokenizer st2 = new StringTokenizer(str, ",");

  while (st2.hasMoreElements()) {
   System.out.println(st2.nextElement());


For example, if your file (test.txt) contain the content like
1| 3.29| mkyong
2| 4.345| eclipse


String line;
br = new BufferedReader(new FileReader("c:/test.txt"));
while ((line = br.readLine()) != null) 
{
 System.out.println(line);
 StringTokenizer stringTokenizer = new StringTokenizer(line, "|");
 while (stringTokenizer.hasMoreElements()) 
 {
  Integer id = Integer.parseInt(stringTokenizer.nextElement().toString());
     Double price = Double.parseDouble(stringTokenizer.nextElement().toString());
     String username = stringTokenizer.nextElement().toString();
     
  StringBuilder sb = new StringBuilder();
  sb.append("\nId : " + id);
  sb.append("\nPrice : " + price);
  sb.append("\nUsername : " + username);
  sb.append("\n*******************\n");

  System.out.println(sb.toString());
   }
}

Output:
1| 3.29| mkyong

Id : 1
Price : 3.29
Username :  mkyong
*******************

2| 4.345| eclipse

Id : 2
Price : 4.345
Username :  eclipse
*******************

Saturday, February 13, 2016

Hadoop Word Count - step by step execution part 2


Check the part 1 here, about how to write and generate *.jar file

Step 1: Download hortonworks sandbox
Get the Hortonworks Sandbox virtual box image from here,
note: i'm not using Hortonworks sandbox, here i have installed hadoop in my virtual Operating system. in your case you can use Hortonworks sandbox.

Open virtual box and select the image (Downloaded from Hortonworks) and click on start.
use credentials to login to the system.


you can connect to the image by using putty, here in my case i configured to 127.0.0.1 port 2222, and create a new directory


Step 2: Creating text file and copying jar file to virtual system.
create a text file that contains the any text, or just copy some code from wikipedia.com and save it as <filename>.txt


use winscp to copy the *.jar file from local system to virtual system, just use drag and drop, it's pretty easy to use.


Change the permission to 755, using chmod command.


Step 3: Copying text(input) file to hdfs
Create a new directory in Hadoop file system by using $hdfs dfs -mkdir ssaik
Check the available directories in the HDFS by using $hdfs dfs -ls


Now it's time to put the text file into the HDFS, using $hdfs dfs -put <filename.txt> /user/hadoop/ssaik/
<filename>.txt is the file, that created in ssaik directory in virtual system.


cat command is used to check the content of the file that is copied to hadoop file system.
$hdfs dfs -cat /user/hadoop/ssaik/<filename>.txt


Step 4: Running map reduce
$hadoop jar <filename>.jar <packagename>.<filename> <filename>.txt /user/hadoop/ssaik/output
/user/hadoop/ssaik/output is used for the output results.


the mapping and reducing progress can be seen on the screen.


Job tracker interface is used to check the state of the application.


Finally the output is


Every hadoop program is gives two files named, part-r-00000, _SUCCESS, can be check through hadoop interface 


Please like and comment.

Friday, February 12, 2016

Hadoop Word Count - step by step execution


Step1: Open eclipse -> File -> New -> Others


Select Maven Project 


The following picture is perfect and do the same


use the filer: org.apache.maven click next


Use Group Id and Artifact Id as the below pic, or you can write anything else


Well, Application project is created successfully, now write the program in step2:

Step2:
pom.xml is the important file, it contains the configuration files of the maven. add the hadoop dependency to the program by editing the pom.xml file.


Copy the following dependency code and use it in pom.xml file.

<dependency>
 <groupId>org.apache.hadoop</groupId>
 <artifactId>hadoop-core</artifactId>
 <version>1.2.1</version>
</dependency>


Step3:
Add new class file to the project as below


give the class name, here used wc and click finish.


Step4: The following is the basic Word Count program is used to find the words along with the repeated number.

Copy this code and use it in eclipse.

package npu.edu.hadoop;
import java.io.IOException;
import java.util.StringTokenizer;

import org.apache.hadoop.conf.Configuration;
import org.apache.hadoop.fs.Path;
import org.apache.hadoop.io.IntWritable;
import org.apache.hadoop.io.Text;
import org.apache.hadoop.mapreduce.Job;
import org.apache.hadoop.mapreduce.Mapper;
import org.apache.hadoop.mapreduce.Reducer;
import org.apache.hadoop.mapreduce.lib.input.FileInputFormat;
import org.apache.hadoop.mapreduce.lib.output.FileOutputFormat;
import org.apache.hadoop.util.GenericOptionsParser;
public class WordCount {
public static class TokenizerMapper
 extends Mapper<Object, Text, Text, IntWritable>{
private final static IntWritable one = new IntWritable(1);
private Text word = new Text();
public void map(Object key, Text value, Context context
 ) throws IOException, InterruptedException {
 StringTokenizer itr = new StringTokenizer(value.toString());
 while (itr.hasMoreTokens()) {
 word.set(itr.nextToken());
 context.write(word, one);
 }
 }
}
public static class IntSumReducer
 extends Reducer<Text,IntWritable,Text,IntWritable> {
private IntWritable result = new IntWritable();
public void reduce(Text key, Iterable<IntWritable> values,
 Context context
 ) throws IOException, InterruptedException {
 int sum = 0;
 for (IntWritable val : values) {
 sum += val.get();
 }
 result.set(sum);
 context.write(key, result);
 }
}
public static void main(String[] args) throws Exception {
Configuration conf = new Configuration();
String[] otherArgs = new GenericOptionsParser(conf,
args).getRemainingArgs();
if (otherArgs.length != 2) {
 System.err.println("Usage: WordCount <in> <out>");
 System.exit(2);
}
Job job = new Job(conf, "word count");
job.setJarByClass(WordCount.class);
job.setMapperClass(TokenizerMapper.class);
job.setCombinerClass(IntSumReducer.class);
job.setReducerClass(IntSumReducer.class);
job.setOutputKeyClass(Text.class);
job.setOutputValueClass(IntWritable.class);
FileInputFormat.addInputPath(job, new Path(otherArgs[0]));
FileOutputFormat.setOutputPath(job, new Path(otherArgs[1]));
System.exit(job.waitForCompletion(true) ? 0 : 1);
 }
}


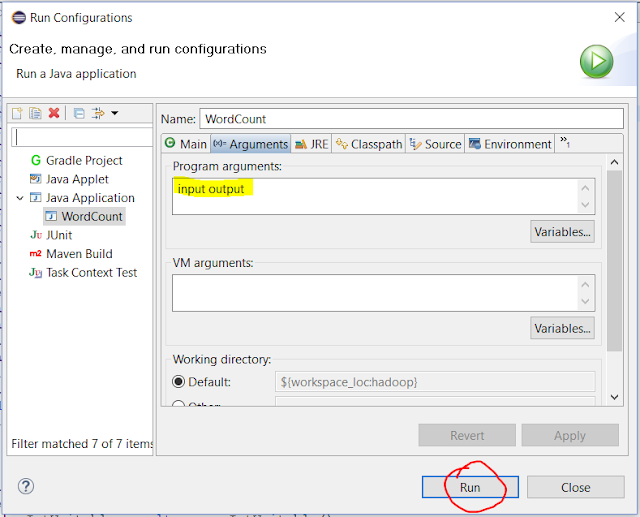
(Optional) Run -> Run configuration -> Arguments -> 
add (input output)


Step5: Run the code and you'll get the error like this, because we use eclipse is only for writing the program, and remaing task is to be done with Hadoop.

Right click on the project select Run As -> Maven Install .. you'll get Build Success, 
Build Failed? just try couple of times  of Maven Install, otherwise clear errors.


You'll get a *.jar file comes with the Build Success, find it in Target Directory.


How to Run the program in Hadoop? Click Here

If you like my Material, Like and Share and Please subscribe my Youtube Channel.

Thursday, February 4, 2016

how to delete windows.old in windows 10


One month after you upgrade to Windows 10, your previous version of Windows will be automatically deleted from your PC. However, if you need to free up disk space, and you’re confident that your files and settings are where you want them to be in Windows 10, you can safely delete it yourself. Keep in mind that you'll be deleting your Windows.old folder, which contains files that give you the option to go back to your previous version of Windows. Deleting your previous version of Windows can’t be undone.
  1. In the search box on the taskbar, type Settings, then select it from the list of results.

  1. Select System > Storage  > This PC and then scroll down the list and select Temporary files.


  1. Under Previous version of Windows, select Delete previous versions and then select Delete.

Source: Microsoft